On this page
Application · 8 min read
Microcement over tiles: how the overlay works, and what it saves
The single most common question we get at survey stage: "can you go straight over the tiles?" Yes — going over existing tiles is one of microcement's core strengths, and it's how a large share of our London and Surrey bathroom and kitchen projects are done. But the overlay only works when the system underneath it is specified properly. Here's how it goes together, what it saves against a rip-out, and the situations where we'd tell you not to do it.
Does microcement over tiles actually work?
Yes — with a properly specified system, tiles are one of the best substrates microcement can go over. Fired ceramic and porcelain are dimensionally stable, dead flat by trade standards, and already bonded to the wall or floor by an adhesive bed that has long since finished moving. That's a better starting point than fresh plaster or a young screed.
The catch is that tile is also non-absorbent. Standard microcement primers rely on soaking into the substrate to grip; on a glazed tile they sit on the surface and do very little. Going over tiles works when the installer treats it as its own specification — different primer, grout treatment, and mesh — rather than the same routine they'd use on plasterboard. Most of the failed overlays we're asked to repair (covered in common issues) come down to someone skipping exactly one of those steps.
The overlay system, layer by layer
On a sound tiled surface, the build-up we install looks like this:
- Check every tile. The whole surface gets tapped and any hollow-sounding, loose or cracked tiles are re-fixed or filled. A drummy tile under microcement becomes a crack within months, so this step is non-negotiable.
- Degrease and abrade. Years of soap film, silicone residue or kitchen grease will defeat any primer. Tiles are cleaned back to bare glaze, then mechanically sanded to key the surface.
- Fill the grout lines. Grout joints sit 1–3 mm below the tile face. They're filled flush with a cementitious levelling compound so the finished plane is continuous. Skipping this is the main cause of grout-line ghosting (more below).
- Non-absorbent-substrate primer. A primer formulated for closed surfaces — Primer Plus or equivalent — creates the chemical bridge between glaze and microcement. This is the single most important line in an over-tile quote.
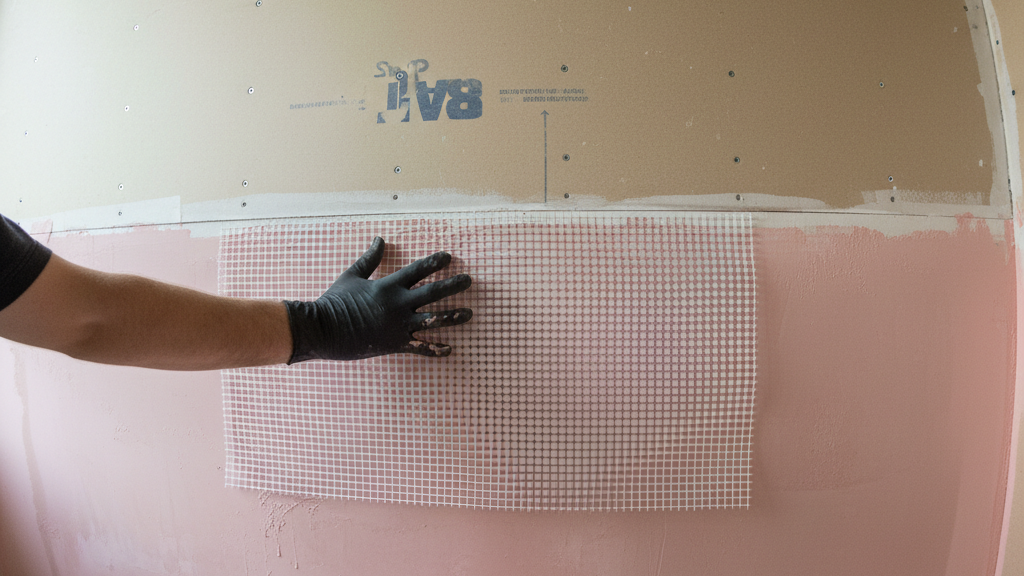
- Fibreglass mesh + two base coats. The mesh spreads any residual movement across the surface instead of letting it concentrate over a joint. Base coats build the body of the finish.
- Two finish coats + sealer. Colour and texture come from the finish coats; the sealer is chosen for the room — wet-zone grade in showers and bathrooms, standard PU elsewhere. The full sealer logic is covered in microcement in bathrooms.
Total added thickness: 2–3 mm. Doors don't need trimming, sockets don't need moving, and in a bathroom the sanitaryware usually stays exactly where it is.
What skipping the rip-out actually saves
The per-m² rate for microcement itself is the same over tile as over any other prepared substrate — the ranges in our microcement cost guide apply unchanged. The saving is everything that doesn't happen:
- Tile removal and disposal — typically £20–£40/m² across London and the south-east once labour, skip hire and disposal fees are counted.
- Substrate repair behind the tiles. Ripping out wall tile takes chunks of plaster or backer board with it, and old floor tile often lifts parts of the screed. What's revealed usually needs patching, re-boarding or self-levelling before any new finish can go on — commonly another £15–£30/m² that an overlay never triggers.
- Time and mess. A bathroom rip-out is two to three days of grinder dust, and wet repair works add drying time before finishing can start. The overlay removes that entire phase — one of the reasons a microcement bathroom refurb often runs shorter than a re-tile of the same room.
- Plumbing stays put. Rip-outs have a habit of disturbing shower valves, cistern fixings and floor wastes. Overlays leave all of it alone.
On a typical 5 m²-floor family bathroom with ~25 m² of tiled surface, that's usually £900–£1,800 of avoided cost before counting the shorter programme — the difference between the middle and the bottom of the quote ranges in the cost guide.
Will grout lines show through?
Not if the system above is followed — but this is the most visible way a cheap overlay announces itself, so it's worth understanding. The risk is called ghosting: months after handover, a faint grid appears in raking light, tracing the old grout joints.
It happens for two reasons. First, unfilled joints: the microcement bridges the gap but slumps fractionally into it as it cures, leaving a shallow depression along every line. Second, differential absorption: grout drinks moisture out of the base coat faster than glazed tile does, curing the material at a slightly different rate and shade along the joints. Filling the joints flush and priming the whole plane with the correct non-absorbent primer removes both mechanisms. On floors with wide (5 mm+) joints we'll sometimes add a full skim of levelling compound across the whole surface first — it adds a day, and it's cheaper than living with a grid you can only see at 4pm in winter sun.
When the overlay is the wrong call
We survey every over-tile job before quoting, and a meaningful minority fail the check. We'd recommend removal rather than overlay when:
- Tiles sound hollow or are visibly tenting. If the tile bed is failing, microcement inherits the failure. A few isolated drummy tiles can be re-fixed; widespread debonding can't.
- There's live movement or an active leak. Cracks that come back after repair, or moisture tracking through from behind, need solving at source first. Microcement is a finish, not a structural repair — the same principle covered in common issues.
- Floor build-up is already tight. 2–3 mm is minimal, but tile-on-tile rooms (it happens) or door thresholds with no tolerance sometimes can't take it.
- The tiles are on a young or suspect screed. If the substrate under the tiles hasn't finished moving, neither has the tile — and neither will the microcement.
- Underfloor heating is being retrofitted at the same time. New UFH means a new build-up anyway, so the old tile usually comes out — the commissioning sequence in underfloor heating compatibility applies from the screed up.
Walls, floors and worktops — where the overlay is used
- Bathroom walls and shower enclosures — the classic case: dated tiles gone, grout maintenance gone, wet-zone sealer over the top. See microcement bathrooms and showers.
- Tiled floors — kitchens, hallways and bathroom floors overlay well, and the saving is biggest here because floor tile removal is the messiest. Spec details on microcement flooring.
- Kitchen splashbacks and tiled worktops — tiled worktops (common in 1990s kitchens) convert to a seamless surface. Edge details matter; see microcement worktops.
- Tiled walls elsewhere — porches, utility rooms, cloakrooms. Same wall system as microcement walls.
Questions to ask any installer quoting over tiles
A competent over-tile quote answers these without hesitation. Evasive answers are the flag:
- "Which primer are you using, and is it rated for non-absorbent substrates?" The answer should name a product. "Our standard primer" is the leading cause of overlays that debond in sheets — the failure mode described in the cost guide's red-flags section.
- "How will you treat the grout lines?" The answer is filled flush, and on wide joints a full skim. "The base coat covers them" is how ghosting happens.
- "Will you tap-test the tiles, and what happens if some are loose?" Re-fix or fill should be in the quote as a provisional item, priced per tile or per m² — not discovered as an extra on day two.
- "Is mesh included across the whole surface?" Over tile, mesh is not optional. It's a few pounds per square metre and it's the difference between one surface and a grid of tiles wearing a thin costume.
- "What sealer, for this room?" Wet zones need wet-zone grade. The full question list for any microcement quote — overlay or not — is in the FAQ.
If you're weighing an overlay against a full rip-out for a specific room, the honest answer usually comes down to what the tap-test says and what the numbers look like side by side — the cost guide has the full pricing context, and a survey settles the rest. And if the real question is whether to keep tile at all, microcement vs tiles is the head-to-head.