On this page
Specification · 6 min read
Microcement and underfloor heating: what to spec, how to commission
Microcement is fully compatible with underfloor heating — over both wet (water-based) and dry (electric) systems. What separates a floor that holds for 15 years from one that cracks in the first winter is entirely about substrate prep, mesh reinforcement, and how the heating is brought up for the first time.
Yes, microcement works with underfloor heating
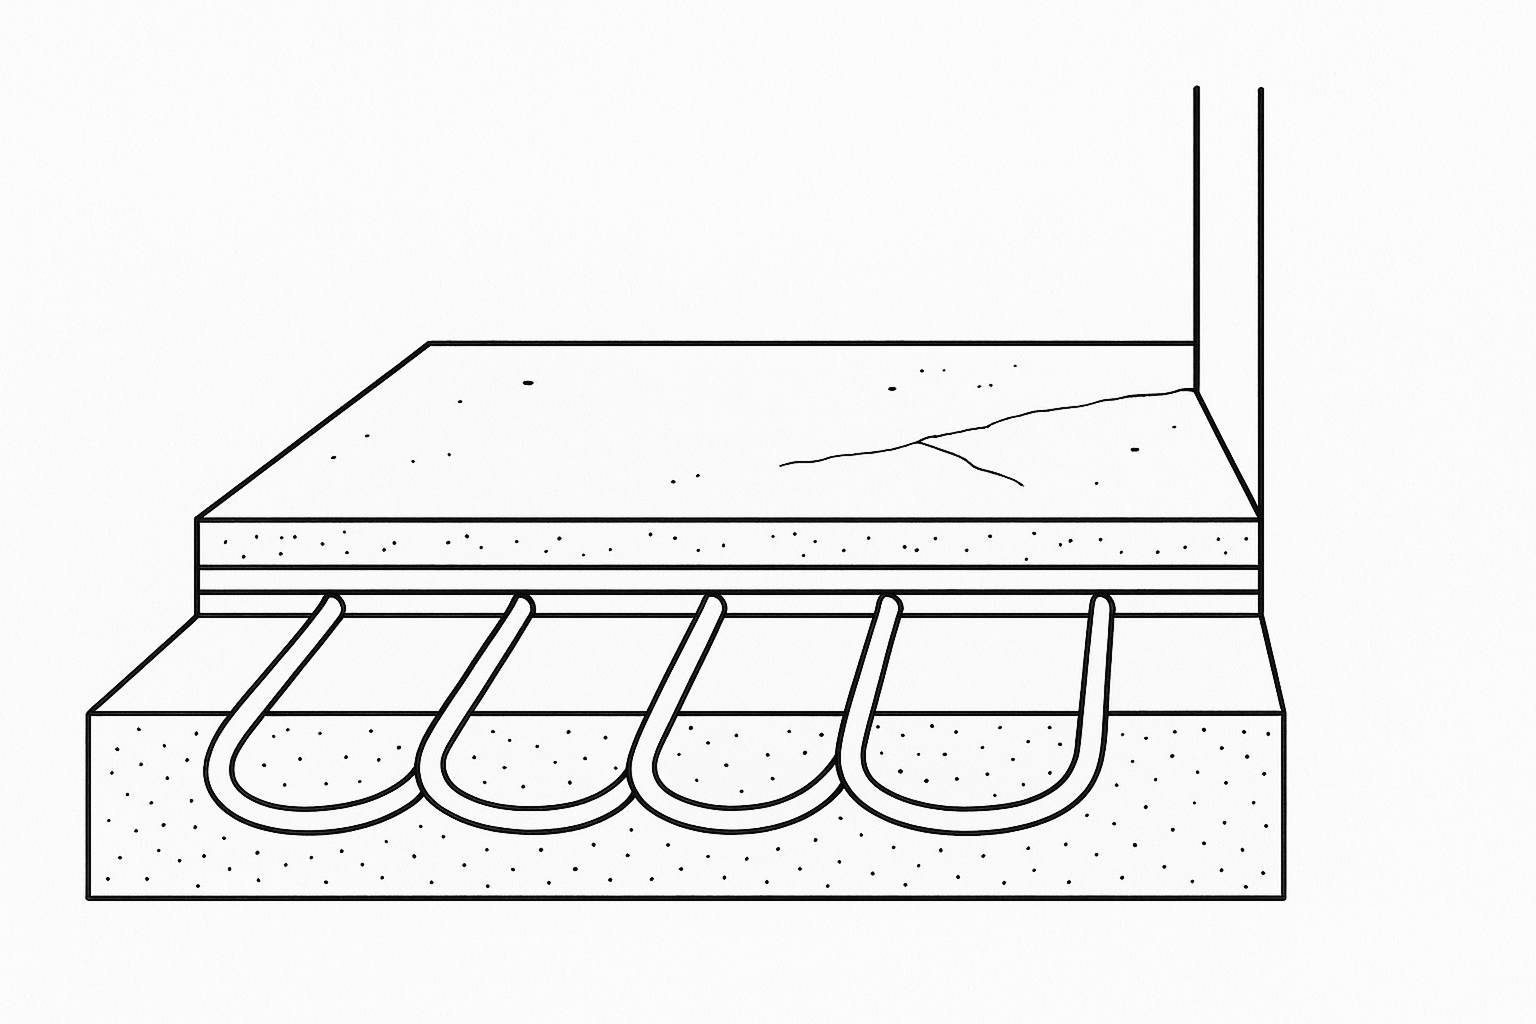
Both microcement floors and walls are compatible with underfloor heating, and the thinness of the system actually helps. At 2 to 3 mm of total build the microcement adds almost no thermal mass between the heating element and the room — practically nothing compared with the 50 mm of screed it sits on top of, and an order of magnitude less than ceramic tile or natural stone. From a heat-up perspective the microcement layer is essentially transparent; the response time of the floor is determined by the screed and insulation under it, not by the finish.
How it compares to other floor finishes over UFH, in rough heat-up order from a cold start: polished concrete fastest (zero added mass), microcement and tile within minutes of that, large-format porcelain similar, engineered wood adds ~30–60 minutes of lag depending on plank thickness, and solid stone (limestone, travertine, marble) adds the most thermal lag of all. Microcement is therefore one of the most energy-efficient finish choices over UFH — fast to respond when the heating comes on, fast to release the heat when it goes off, with no warm-floor "after-glow" wasting energy after the thermostat shuts the call.
The compatibility hinges on three things: the screed underneath being properly cured and crack-free, fibreglass mesh embedded in the primer layer to handle thermal movement, and a controlled commissioning sequence that doesn't shock the freshly-cured microcement. Get any of those wrong and you've got a floor that cracks within the first heating season; get all of them right and the floor holds for the full ten-to-fifteen-year sealer cycle without issue.
The two UFH systems — and what changes per system
There are two flavours of underfloor heating in UK residential use, and both are compatible with microcement. The differences matter for cost, retrofit feasibility, and response time, but not really for the microcement install itself:
- Wet (water-based) UFH — pipes circulating warm water (typically 35–45°C, much cooler than radiators) through a screed. Pipes go in at 100–200 mm centres, embedded in 50–75 mm of liquid or sand-cement screed over insulation. More common in new-builds, ground-floor extensions, and any room with ample build-up depth. Slower thermal response (typically 30–90 minutes from cold to warm floor) but considerably lower running cost — about a third the running cost of electric per kWh delivered, especially with a heat pump as the source.
- Dry (electric) UFH — heating mat or loose cable, either embedded in a thin self-levelling compound (5–15 mm) or laid directly under the finish with insulation underneath. More common in retrofits where you can't lose 75 mm of floor height, in upper-floor bathrooms where wet UFH would be overkill, and in single rooms (en-suites, kitchens) where adding to the wet UFH manifold would be a major plumbing job. Fast thermal response (5–15 minutes from cold to warm), but higher running cost — most economical when used as supplementary or zoned heating rather than primary heating.
From a microcement perspective, the principles are identical for both: the substrate above the heating must be sound, fully cured, properly insulated underneath, and crack-free. The main differences from the installer's point of view:
- Screed thickness above the heating — 50–75 mm for wet systems, 5–15 mm for electric. Wet-system screeds typically need 4–6 weeks to cure before microcement can go on; electric-system self-levelling compounds typically need 7–14 days.
- Pre-install commissioning — wet systems need a full 10–14-day commissioning cycle before the microcement goes down (more on this below); electric systems are usually quicker to commission.
- Mesh weight — both need fibreglass mesh, but heavier-weight 100 g/m² mesh is the right specification for wet UFH where the screed is thicker and has more thermal mass to move.
For most retrofit projects we see, the question is which system the existing slab can accommodate. If you've got 75 mm of floor height to spare and central heating you're upgrading anyway, wet UFH plus microcement is the better long-term answer. If you've only got 15 mm and you're doing a single-bathroom retrofit, electric UFH plus microcement is the right combo.
Substrate and screed — the make-or-break stage
Most underfloor-heating microcement failures start here. The screed underneath is doing two jobs at once — distributing the heat from the pipes evenly across the floor, and providing a flat sound substrate for the microcement to bond to. If it's not fully cured, not flat, not crack-free, and not moisture-tested before microcement goes on, the failure is baked in.
The screed must be:
- Fully cured. For a typical 50 mm liquid screed (anhydrite or calcium-sulphate-based), allow 4 weeks under ambient drying conditions or longer in winter. For traditional sand-and-cement, 6–8 weeks at minimum. For thicker screeds (75 mm and above) add another 1–2 weeks per 25 mm of additional thickness. The "1 mm per day" rule of thumb that some builders cite is roughly right for liquid screed at 20°C and 60% RH; in real UK conditions (especially winter) it's optimistic.
- Below 3% moisture content by weight — measured with a calibrated meter, not estimated, and not "looks dry." For anhydrite screeds we use the calcium carbide (CM) test as the gold standard; for cement screeds either CM or a calibrated capacitance meter. Surface readings alone aren't enough; we drill into the screed to depth-test if there's any doubt. We refuse to apply over a screed that hasn't been moisture-tested. If a contractor doesn't own a moisture meter, that's a flag.
- Free of laitance and any surface contamination. Liquid anhydrite screed in particular forms a thin chalky laitance on the surface as it dries, which has to be ground off before priming or the primer doesn't bond. Light grinding with a planetary grinder followed by thorough HEPA-vacuum cleaning is the right method. Cement screeds with curing compounds also need grinding off.
- Crack-free at the visible surface. Any cracks wider than 0.5 mm filled with a flexible repair compound before priming. Hairline shrinkage cracks under 0.5 mm are usually OK because the embedded mesh handles them, but we still walk the floor and tap-test for hollow spots that suggest the crack goes deeper.
- Free of expansion-joint complications. Wet UFH screeds are usually divided into bays by movement joints (every 40–50 m² typically). The microcement runs continuously across these joints; the embedded mesh absorbs the joint movement. But the joint needs to be clean and free of debris before priming, and we sometimes specify a heavier-weight mesh strip directly over each joint for additional reinforcement.
If any of these can't be met, the answer is to wait. Applying over an underprepared screed is the single biggest cause of cracking and bonding failure on heated floors. Better a one-week delay than a 12-month-later partial demolition and re-do.
Fibreglass mesh — non-negotiable on heated floors
Microcement is rigid. Heated screeds expand and contract through every heating cycle — typically a few millimetres of dimensional movement across a typical room as the floor warms from 16°C ambient to 28°C surface temperature. Cumulatively, a heated floor in a UK home goes through several hundred thermal cycles per year (mostly small swings, some big ones). To absorb that movement without cracking the visible finish, we embed a fibreglass reinforcement mesh in the primer layer before the base coats go down.
The mesh sits in the first ~0.5 mm of the system, just above the primer and just below the first base coat. It's invisible in the finished floor but does the structural work — distributing the small movements of the screed across the entire surface area instead of letting them concentrate at a single line. Without it, the microcement cracks above the screed expansion joints (typically 4–6 m on centres) within the first heating season; within three years there are visible hairline cracks marking every joint.
Specifying mesh on heated floors:
- Weight: 100 g/m² alkali-resistant glass-fibre mesh, in 1 m rolls. Lighter 60 g/m² mesh is fine for unheated walls but is at the bottom of the spec for heated floors.
- Overlap at joints: 100 mm minimum where two roll widths meet. Not 50 mm, not "as needed."
- Corner reinforcement strips at every internal corner, around door reveals, at the perimeter where the floor meets a wall.
- Bridging strips over screed expansion joints — heavier-grade mesh laid directly over each joint to add reinforcement at the point most likely to move.
- Smooth-rolled into the primer with no air pockets — air pockets under mesh are local crack initiators.
Any quote for a microcement floor over UFH that doesn't explicitly include fibreglass mesh is a quote that's going to crack. The total mesh-and-primer cost addition is around £8–£15/m² of materials and an hour of labour per 10 m² — small money compared to the cost of having the floor partially redone in year two. See the rest of the install kit in our microcement toolkit guide.
The first heating cycle — sequence matters
This is the part most installers get wrong, even ones who otherwise know what they're doing. The screed needs to be thermally stress-tested before the microcement goes on, not after. The proper commissioning sequence:
- Step 1 — initial heating before microcement goes down. Once the screed is fully cured, heat it through a full commissioning cycle as specified by the UFH manufacturer. Typical procedure: start at 5°C above ambient, hold for 3 days, then ramp 1°C per day up to maximum design temperature (typically 45°C flow temperature for wet UFH, surface temperature ~28°C), hold for 3 days, then ramp back down 1°C per day to ambient. The whole cycle is 10–14 days. This drives out residual screed moisture and stress-tests the screed at its working temperature, finding any movement or crack issues before the microcement is on top of them.
- Step 2 — cool screed and verify moisture. After the commissioning cycle, allow the screed to cool back to ambient (1–3 days), then verify moisture content is below 3% with a calibrated meter. Anhydrite screeds in particular release a lot of moisture during the first heating, and the post-cycle moisture check is what confirms the screed is ready.
- Step 3 — apply microcement, including the full mesh + base + finish + sealer sequence. With heating off, room temperature 15–25°C, humidity below 70%. Typically 10–14 days from start to handover.
- Step 4 — allow 14 days minimum cure after the sealer's final coat before re-firing the heating. The PU sealer continues to cure for several weeks after application; firing the heating before it's fully cured can cause yellowing, bubbling, or accelerated wear at thermal-stress points.
- Step 5 — ramp the heating up slowly on first re-fire: no more than 5°C per day from ambient to working temperature. A floor going from cold to 28°C overnight is the classic way to crack new microcement. Good practice: start at 21°C, hold for 24 hours, then 23°C for 24 hours, then 25°C for 24 hours, then to working temperature. The slow ramp gives the microcement-and-screed assembly time to settle through its first big thermal swing without snapping at any single location.
If the building programme doesn't allow time for steps 1 and 2, the answer is to slip the schedule, not skip the steps. The cost of a one-week schedule slip at design stage is far less than the cost of a partial demolition and re-do at year two when the cracks turn up.
One specific scenario worth flagging: if you've already lived with the heating for a season (e.g. a retrofit microcement going onto an existing screed where the heating has been running for years), step 1 is essentially already done. We still verify moisture content, but the screed has long since stabilised through normal heating cycles. The new-screed scenario is the one that needs the formal commissioning cycle.
Living with a heated microcement floor
Once commissioned correctly, a heated microcement floor behaves like any other UFH floor — only better, because the thin finish gives the most responsive heat-up of any common floor finish. The room heats from the floor up rather than from a radiator, the temperature feels more even from floor to ceiling, and the comfort level at a given air temperature is typically 2–3°C below what radiators feel like.

Practical things to know once it's installed:
- Energy savings versus radiators: typically 15–20% lower running cost for the same comfort level, more if you're using a heat pump as the source. Microcement floors hit the published savings figures because the finish doesn't add lag — there's no waste energy heating an inert floor mass before the room benefits.
- Maximum surface temperature: 27–29°C is the comfort ceiling for residential UFH, regardless of finish. Higher than that feels too warm underfoot. Microcement handles this range comfortably; we don't recommend running heated microcement above 29°C surface temperature, both for comfort and to keep thermal cycling manageable.
- Foot feel: a sealed microcement floor at 24–26°C is one of the more pleasant surfaces to walk on barefoot — neither cold like stone nor warm like wood, just a quiet uniform comfort. Several clients have described it as the single best change in their bathroom or kitchen.
- Smart-thermostat integration: standard UFH controllers (Heatmiser, Honeywell, Hive, Nest with appropriate add-ons) all work normally with microcement floors. The slow-ramp rule is mostly about the first heating after install; once commissioned, the floor accepts normal day-to-day temperature changes without issue.
- Day-to-day cleaning: same as any microcement floor — soft mop with pH-neutral cleaner, wipe up spills as they happen. The heating doesn't change the maintenance schedule.
- Sealer refresh interval: heated floors thermal-cycle the surface a little, so the sealer benefits from a refresh slightly earlier in heated rooms — typically 10 years rather than the 12–15 of an unheated floor. The refresh is still done in place — no demolition, just a clean and a fresh top-coat applied over a couple of days.
The mistakes that crack a heated floor
Almost every microcement-over-UFH failure traces back to one of these. The pattern is almost always the same: the issue isn't visible on day one, but it's baked into the install. Six to twelve months in, the cracks (or blistering, or efflorescence) appear, and by then the only fix is partial demolition and re-application.
- Skipping the pre-install commissioning cycle — applying over a screed that hasn't been heated through its first thermal stress test. The screed releases residual moisture and stress through that first commissioning, which the microcement then has to handle from above.
- No fibreglass mesh, or wrong-weight mesh — leaving the microcement to take screed-joint movement directly. The cracks track the joints.
- Too-fast first heat-up after install — going from cold to working temp in a day rather than over a week. The fast thermal swing causes the freshly-cured microcement to expand uniformly while the screed beneath warms more slowly, creating shear at the bond line.
- Wet screed — applying before moisture content is below 3%. Trapped moisture works its way up through the microcement over the first few months as the floor heats, showing as efflorescence (white salt deposits) or surface blistering. Most common in winter installs where the screed didn't have summer drying conditions.
- Wrong sealer for heated zones — some standard PU sealers chalk under repeated thermal cycling, dulling the surface within a couple of years. The heated-floor variant of the sealer is what to spec; ask explicitly.
- Underspec'd insulation under the heating — not really a microcement issue, but a project issue. If the insulation under the heating is too thin (anything less than ~50 mm of PIR for ground-floor), heat leaks downwards and the system runs hot to compensate. Hot screeds are stressed screeds, which then stress the microcement above.
- Missing perimeter expansion strip — the foam strip that goes around the perimeter of the screed before it's poured, allowing it to expand into the strip rather than against the wall. If it's missing, the screed cracks at the wall and the microcement cracks above.
- Wrong screed mix for UFH — sometimes builders pour standard sand-and-cement where a UFH-rated mix or a free-flowing anhydrite would be better. Standard mixes can crack under thermal cycling more aggressively than UFH-formulated screeds.
None of these are visible problems on day one. They show up six to twelve months in, by which point the only fix is partial demolition and re-application. The questions worth asking at the survey stage — and what to push back on if a quote looks suspiciously cheap — are in the FAQ and the cost guide.